Technology

Cloudy with a Chance of Fog
Today’s Best Options for Fighting Contact Lens Fogging.
Great overview of many options for mitigating contact lens fogging.

Recent Advances in Orthokeratology
This paper contains an excellent description of the physics of the mechanism that changes the corneal shape.

The Anatomy of a Modern Orthokeratology Lens
We believe this Is one of the best introductions to Ortho-K lens design, with details defining the function of each design parameter.

Cutting Through the Fog
By: The Visionary Contact Lens Team
The professionals at Visionary discuss fogging, what it is and how to manage it.

Cutting Through the Fog
This article presents very practical tips for addressing some of the more advanced issues with Ortho-K fitting such as halos, an incomplete reverse curve ring and lens binding.
Cutting Through the Fog
By: The Visionary Contact Lens Team
“Foggy lens” is the most common description we hear to describe the dirty contact lens phenomenon that periodically plagues wearers. We also hear it described as a “film on the lens”, “grimy lens” or in the case of Scleral contact lenses wearers, they lament about “mid-day fogging”. No matter what you call it, the conditions are all related.
What Is Happening?
The phenomenon is relatively well defined. Lipids and proteins that exist in the tear layer become attracted to the lens surface and will adhere with a stubborn resilience. When looking at a lens surface through a 10x loupe, sometimes we see a crusty formation that we believe is protein build up. Sometimes we see an oily-like film that we believe is a build-up of lipids. There is also a variation in how long it takes for the lens to get dirty. In some cases, the lens will fog immediately on application. In other cases, the lens gets increasingly dirty over a longer period of time.
What is the Cause?
The dirty lens problem can come from two different sources: a faulty contact lens surface or an imperfect tear film. The unfavorable conditions of the tear film or lens surface (or both) result in conditions that cause the lipids and proteins to attract to the lens surface. Let’s examine how that happens.
When talking about the lens surface it is desirable to have as much wettability as possible in order to attract water and repel lipids and proteins. The silicone in GP materials make them naturally hydrophobic. Therefore, material manufacturers will add materials, such as fluorine to make them more water-loving and wettable. But if the surface of the lens isn’t perfectly clean and pristine, it won’t attract water and leaves the surface prone to attracting lipids and proteins. There are several ways an unworn lens surface can become unwettable. For example, a dirty surface is unwettable. Simple handling using unclean hands with make-up, lotions or other products can introduce dirt and lipids to the surface making it unwettable. Also, some believe that non-FDA approved lens cases will “sweat” oils onto the lens surface. In rare cases, the manufacturing process may introduce an unwettable surface if, for example, the diamond tool is not perfectly sharp, and the lens surface becomes microscopically rough.
Now let’s talk about the tear film. The tear film naturally contains proteins and lipids. But what makes them attract to a lens surface, in some cases very rapidly and some cases more slowly and some cases not at all? For one, if the properties of the tear film become disrupted and unbalanced, the lipids and proteins will no longer stay suspended in the tear layer and will migrate to the lens surface. Example circumstances are, dry eye syndrome, allergies, medications, thinning or rapidly evaporating tear layer can create an unstable tear layer. Ambient conditions such as low humidity, exposure to smoke or pollutants can also create an unstable tear layer. The worse the condition, the more rapidly the migration will occur.
Avoiding the Problem
- Most important is to maintain a clean lens. Lens care and cleaning regimen are well established and include the following tips:
- Ask lens manufacturer to Plasma clean the lens to start with a super clean lens surface.
- Use FDA approved multipurpose GP lens cleaners such as
- Tangible Clean
- Boston Simplus
- Make sure hands and all accessories (DMV, lens case, etc) are clean.
- During cleaning, rub lens between fingers to dislodge proteins and lipids.
- Don’t use tap water.
- Perform a weekly deep clean with stronger FDA approved cleaners.
- Hydra-PEG lenses to enhance lens surface wettability.
- Apply preservative-free viscous lubricating drops to the tear film.
Fixing the Problem
- Use a strong FDA approved aggressive GP lens cleaning product. Make sure to rub the lens surface to dislodge buildup and soak the lens. Some of the aggressive cleaners on the market include:
- Projent
- Boston Advance
- Boston Enzymatic Cleaner
- Clear Care (Hydrogen Peroxide)
- Plasma clean the lens to create a super clean wettable lens surface
- Switch to a material with higher amounts of fluorine and wettability such as B&L’s XO.
- Change the lens design to enhance tear exchange. (Not possible for Scleral lenses)
- Remake the lens to eliminate any manufactured induced anomalies.
Beyond the Basics: Ortho-k Troubleshooting |
||||
Nicholas Gidosh, OD |
||||
|
Most eyecare practitioners (ECPs) fitting orthokeratology (ortho-k) are familiar with troubleshooting tools to improve lens centration. Ortho-k designs’ basic troubleshooting guides cover resolving issues such as superior, inferior, and lateral lens decentration. But what if those basic tools don’t fix the problem? Let’s delve into some of the less common ortho-k fit issues practitioners might encounter and explore strategies to improve ortho-k fitting success. It’s important to note that many of the topographical presentations discussed can occur without causing problems and may not necessitate any lens modifications. In general, avoid making fit changes if there is no compromise to corneal health or vision. Glare and Haloes
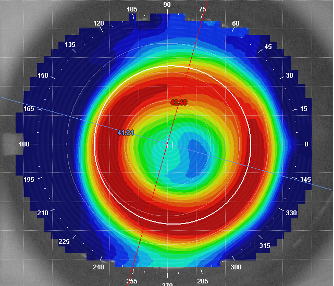 Figure 1. Corneal topography of an ortho-k lens where the reverse curve ring is located inside the pupil, potentially resulting in haloes and glare.
Glare and haloes are not typically reported by younger patients (< 16 years old), though older patients (16+ years) may notice issues when they begin driving or spend a great deal of time in low-light conditions. While research indicates that smaller optic zones may provide better myopia management,1 the risk of myopic progression typically slows after age 16.2 If myopia management is not the primary goal of treatment, consider increasing the optic zone size to reduce haloes and glare for most patients. But if myopia management is the primary goal of treatment, consider the potential trade-offs of choosing a larger versus a smaller treatment zone. Incomplete Reverse Curve Ring
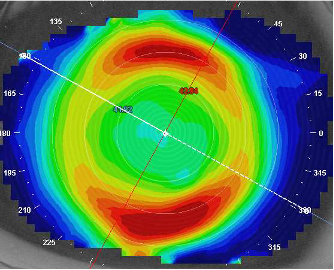
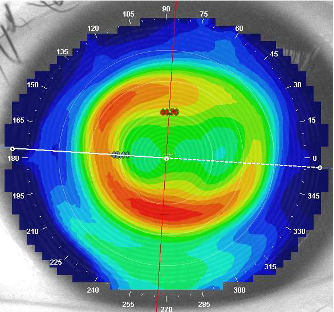 Figure 2. Corneal topography showing an incomplete reverse curve supratemporally.
Such topography patterns can commonly occur without issue and may not require any lens modifications. If the patient’s vision is significantly reduced, consider adjusting the peripheral toricity of the ortho-k design to resolve this issue. Air Bubbles Moderate to large-sized bubbles can cause double-ring patterns on topography and vision complaints (Figures 4, 5, and 6). If there is no compromise to corneal health or vision, application bubbles can be monitored without lens adjustments. If corneal health or vision complaints are observed, advise the patient to use a more viscous application drop, apply the lens face down, and immediately go to sleep. If the air bubbles persist, the sagittal height of the lens may be too high and require flattening of the reverse curve to resolve the issue.
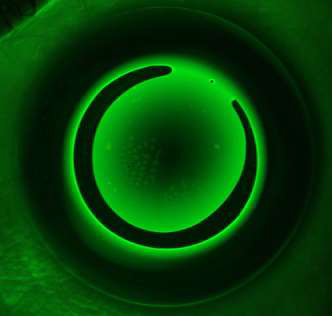
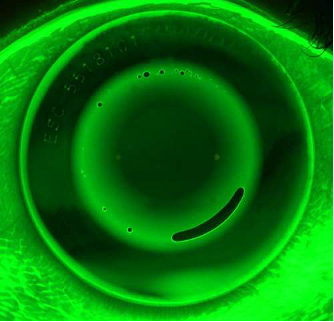 Figure 4. Tiny air bubbles in the reverse curve of an ortho-k lens.
Lens Binding Topographies may show a focal area of steepening corresponding to the epithelial indentation site (Figure 7).
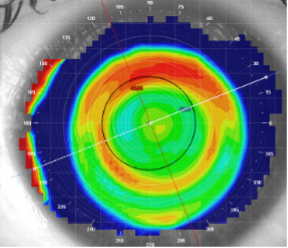 Figure 7. Corneal topography of a patient experiencing lens binding. Note the sharp ring of localized steepening superiorly.
Binding can occur mid-peripherally or peripherally and can be identified by the location of corneal indentation (Figure 8). If the indentation appears focused mid-peripherally, consider flattening the reverse curve to loosen the fit. If staining occurs peripherally, flatten the alignment and peripheral curves to loosen the fit.
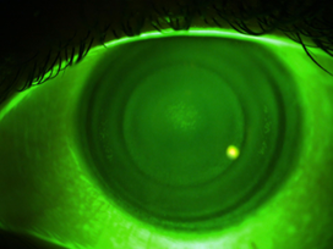 Figure 8. Corneal indentation pattern from lens binding.
References:
|
||||


